Welcome to our new tutorial on Android Studio . On this tutorial we are going to build an application with all features and every thing integrated like splash screen , notification system , in-build update checker , custom off-line notification , etc ...
Watch the video and follow me :
- Build a new Android Studio Project .
- I am using the package name as com.techmobs.app here you can change it to any other name that you like , but be care full while copy pasting the codes don't make the package name on each files wrong be sure that you use the same package name every where .
- Choose the Navigation Drawer Activity .
- After gradle build up we can move on to the AndroidManifest.xml file
- Open AndroidManifest.xml file and select the entire codes and replace it with the code bellow . Don't make package name error , be careful .
- Now move on to the MainActivity.java file .
- Select the entire codes and replace it with the code bellow . Don't make package name error , be careful .
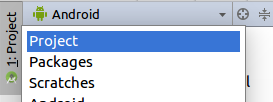
- Open Projects .


- Download the volley.jar file , copy and paste it in the libs folder .
- Left click on the volley.jar file and select Add as Library option and click ok . Now the gradle will build and after that you need to go back to Android .
- Create a new java class with name UpdateDialog .
- Select the entire codes and replace it with the code bellow . Don't make package name error , be careful .
- Create another java class with name UpdateService .
- Select the entire codes and replace it with the code bellow . Don't make package name error , be careful .
- Now we need to add an assets folder , left click on the app , then select new , then select folder , then select Assets Folder and click Finish .

- Now create a file in the assets , left click then select new then File .
- Name the file update.html , paste the following codes in the file .
- We need to add a new activity , again at app left click and select new then select Activity then Empty Activity .
- Name the activity as splash , then the layout name automatically becomes activity_splash .

- Now we will get to files splash.java and activity_splash.xml .
- Open splash.java file . Select the entire codes and replace it with the code bellow . Don't make package name error , be careful .
- Open res , layout , activity_splash.xml . Select the entire codes and replace it with the code bellow . Don't make package name error , be careful .
- Now the activity_main.xml file . Select the entire codes and replace it with the code bellow . Don't make package name error , be careful .
- Open app_bar_main.xml file . Select the entire codes and replace it with the code bellow . Don't make package name error , be careful .
- Open content_main.xml file . Select the entire codes and replace it with the code bellow . Don't make package name error , be careful .
- Open nav_header_main.xml file . Select the entire codes and replace it with the code bellow . Don't make package name error , be careful .
- Open the res , menu folder , activity_main_drawer.xml file . Select the entire codes and replace it with the code bellow . Don't make package name error , be careful .
- Open main.xml file . Select the entire codes and replace it with the code bellow . Don't make package name error , be careful .
- Now open the folder res , values , colors.xml file . Select the entire codes and replace it with the code bellow . Don't make package name error , be careful .
- Open styles.xml file . Select the entire codes and replace it with the code bellow . Don't make package name error , be careful .
- Now go through the java parts again to change the links , name , email , etc
- First of all the MainActivity.java file , open it and replace the website urls with your website url . Watch video for more clarification .
- Like that the splash.java file replace the facebook , google+ , twitter links .
- Now the UpdateService.java "https://vishnutechmobs.github.io/update-link.html" this is the link link which is checked when the application opens . The content in line
Intent intent =newIntent(MainActivity.this,UpdateService.class)
startService(intent);
- Now watch the video and clarify if more doubts are there .
- Build your apk and then you will get your application .


Really Helpfull
ReplyDelete